
Google’s Vertex AI makes it easier than ever to build, train, and deploy powerful AI agents in the cloud. Whether you want to build a smart chatbot, a prediction engine, or a recommendation system, Vertex AI gives you all the tools to do it in one place.
In this tutorial, you will learn how to build an AI agent using Vertex AI step by step with real examples and practical guidance.
You don’t need to be a cloud expert, but you should be comfortable with Python and machine learning basics.
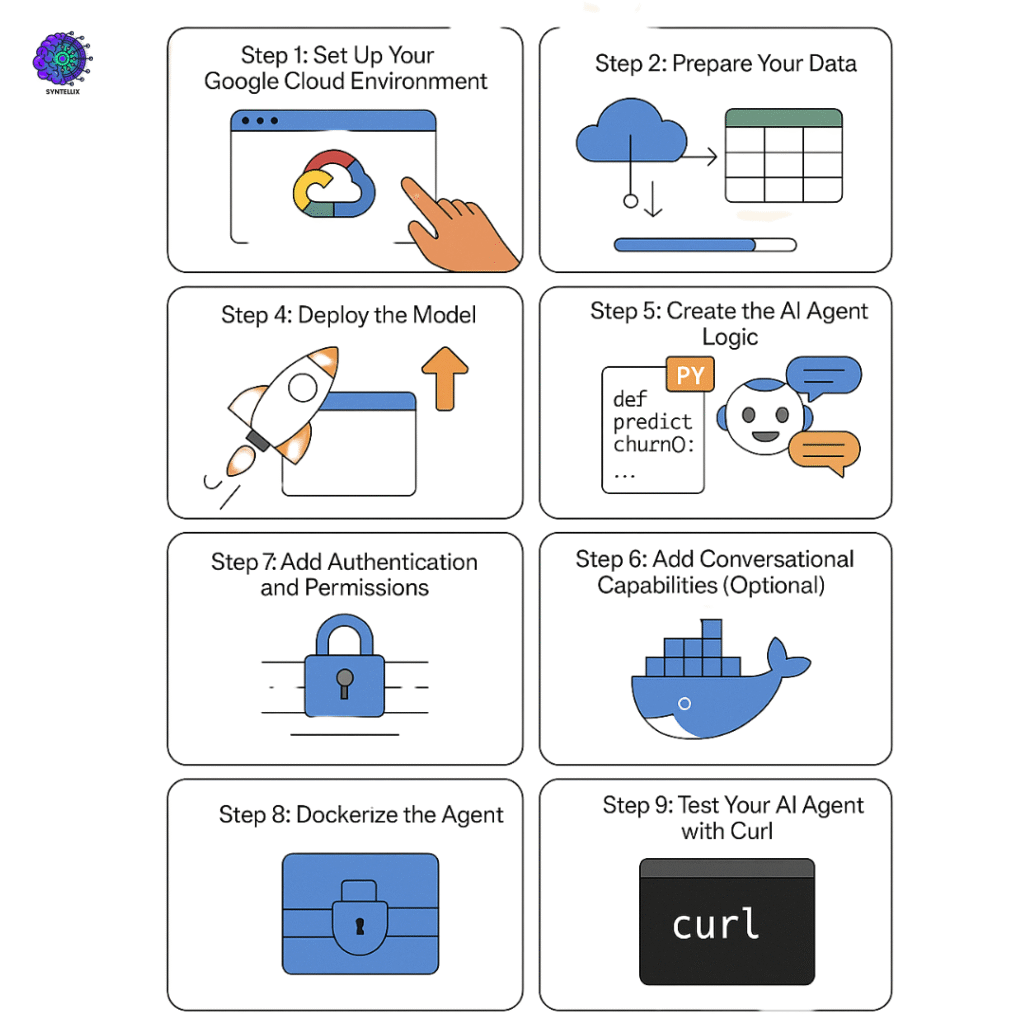
Step 1: Set Up Your Google Cloud Environment
Before you build anything, let’s get your Google Cloud Platform (GCP) ready.
Create a GCP Project
- Visit console.cloud.google.com.
- Click on “Select a project” → New Project.
- Give your project a name like
vertex-ai-demo-agent.
Enable Billing and APIs
- Link a billing account to your project.
- Go to APIs & Services > Library.
- Enable:
- Vertex AI API
- Cloud Storage
- IAM & Admin
Install Google Cloud SDK (CLI)
If you are working locally:
curl https://sdk.cloud.google.com | bash
gcloud init
Login and set your active project:
gcloud config set project vertex-ai-demo-agent
Step 2: Prepare Your Data
Let’s use a sample dataset. For this tutorial, we’ll use a customer churn dataset (churn_data.csv), which predicts whether a customer will leave based on behavior.
Upload Data to Cloud Storage
- Go to Cloud Storage in your GCP console.
- Create a new bucket, e.g.,
vertex-ai-churn-data. - Upload
churn_data.csv.
Alternatively, use CLI:
gsutil mb -l us-central1 gs://vertex-ai-churn-data
gsutil cp churn_data.csv gs://vertex-ai-churn-data/
Download the dataset from here.
Step 3: Train Your AI Model
Now let’s train a model that predicts churn using AutoML Tabular.
Use Vertex AI to Create a Dataset
- Go to Vertex AI > Datasets > Create.
- Choose Tabular, give it a name like
Customer Churn, and import from the Cloud Storage bucket. - Select the target column (e.g.,
churn) for prediction.
Start Training
- Click Train new model.
- Choose AutoML (for no-code) or custom training (if you’re using a Jupyter notebook).
- Let the model train. It usually takes a few minutes depending on data size.
Step 4: Deploy the Model
Once the model is trained:
- Go to Models > Your Model > Deploy to Endpoint.
- Name the endpoint
churn-predictor. - Set minimal machine type (e.g.,
n1-standard-2) for this example.
After deployment, Vertex gives you a REST endpoint and API key to send data for predictions.
Step 5: Create the AI Agent Logic
Let’s build a small Python backend that uses this model to respond to user input.
Python Code Example (agent.py)
from google.cloud import aiplatform
import json

aiplatform.init(project="vertex-ai-demo-agent", location="us-central1")

endpoint = aiplatform.Endpoint(endpoint_name="your-endpoint-id")

def predict_churn(user_data):
    prediction = endpoint.predict(instances=[user_data])
    return prediction.predictions[0]

# Example usage
sample = {
    "age": 45,
    "monthly_charges": 80.5,
    "total_charges": 4200,
    "tenure": 24
}
result = predict_churn(sample)
print("Will this customer churn?", result)
Step 6: Add Conversational Capabilities (Optional)
Want to make your agent talk like a chatbot? Use Dialogflow CX and connect it to Vertex AI.
- Go to Dialogflow CX in Google Cloud.
- Create a flow with intents like “Check if user will churn”.
- Use a webhook that calls your Python model endpoint and responds accordingly.
Step 7: Add Authentication and Permissions
Don’t forget to secure your endpoint:
- Use IAM roles to control access.
- Store credentials in Secret Manager.
- Restrict endpoint usage to certain service accounts.
Step 8: Dockerize the Agent
Let’s turn our Python code into a Docker app.
Create a Dockerfile:
FROM python:3.10
WORKDIR /app
COPY requirements.txt .
RUN pip install -r requirements.txt
COPY agent.py .
CMD ["python", "agent.py"]
Build and Run:
docker build -t vertex-ai-agent .
docker run vertex-ai-agent
Step 9: Test Your AI Agent with Curl
You can test your deployed model with a simple curl command:
curl -X POST \
  -H "Authorization: Bearer $(gcloud auth print-access-token)" \
  -H "Content-Type: application/json" \
  https://REGION-aiplatform.googleapis.com/v1/projects/PROJECT/locations/REGION/endpoints/ENDPOINT:predict \
  -d '{"instances": [{"age": 45, "monthly_charges": 80.5, "tenure": 24}]}'
You’ll get a response like:
{"predictions": [true]}
Common Use Cases
- Customer churn prediction.
- AI-powered chatbots.
- Sales forecasting.
- Smart recommendations.
- Document classification.
Hacks to Optimize Your Agent
- Retrain your model every few months.
- Monitor accuracy using Vertex’s model monitoring tools.
- Try A/B testing different model versions.
- Use feature importance tools to improve your dataset.
Conclusion
Building an AI agent with Vertex AI is no longer a complex task. With Google Cloud’s powerful tools, you can go from raw data to a fully functional AI-powered app in just a few steps.
No matter you are creating a simple prediction tool or a full chatbot, Vertex AI has everything you need from training to deployment. Now is the best time to build something impactful with AI.
👉 Ready to get started? Sign up for a Google Cloud free tier and try building your first AI agent today!
Stay ahead of the curve with the latest insights, tips, and trends in AI, technology, and innovation.